Mexican birth certificate: source and English translation
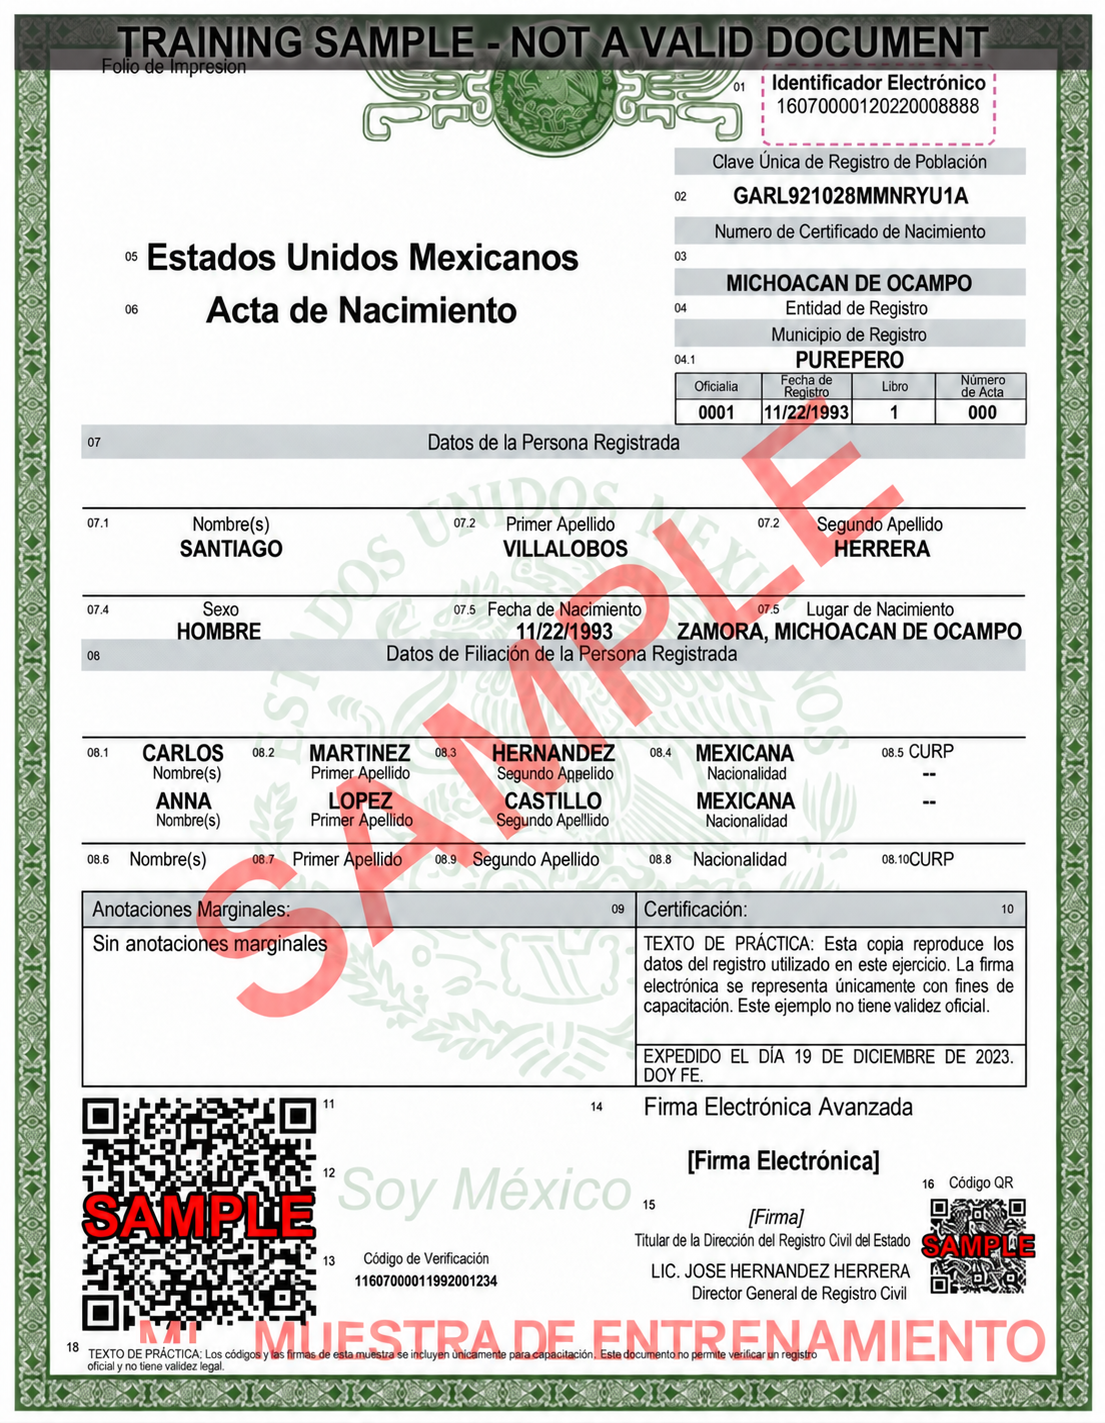
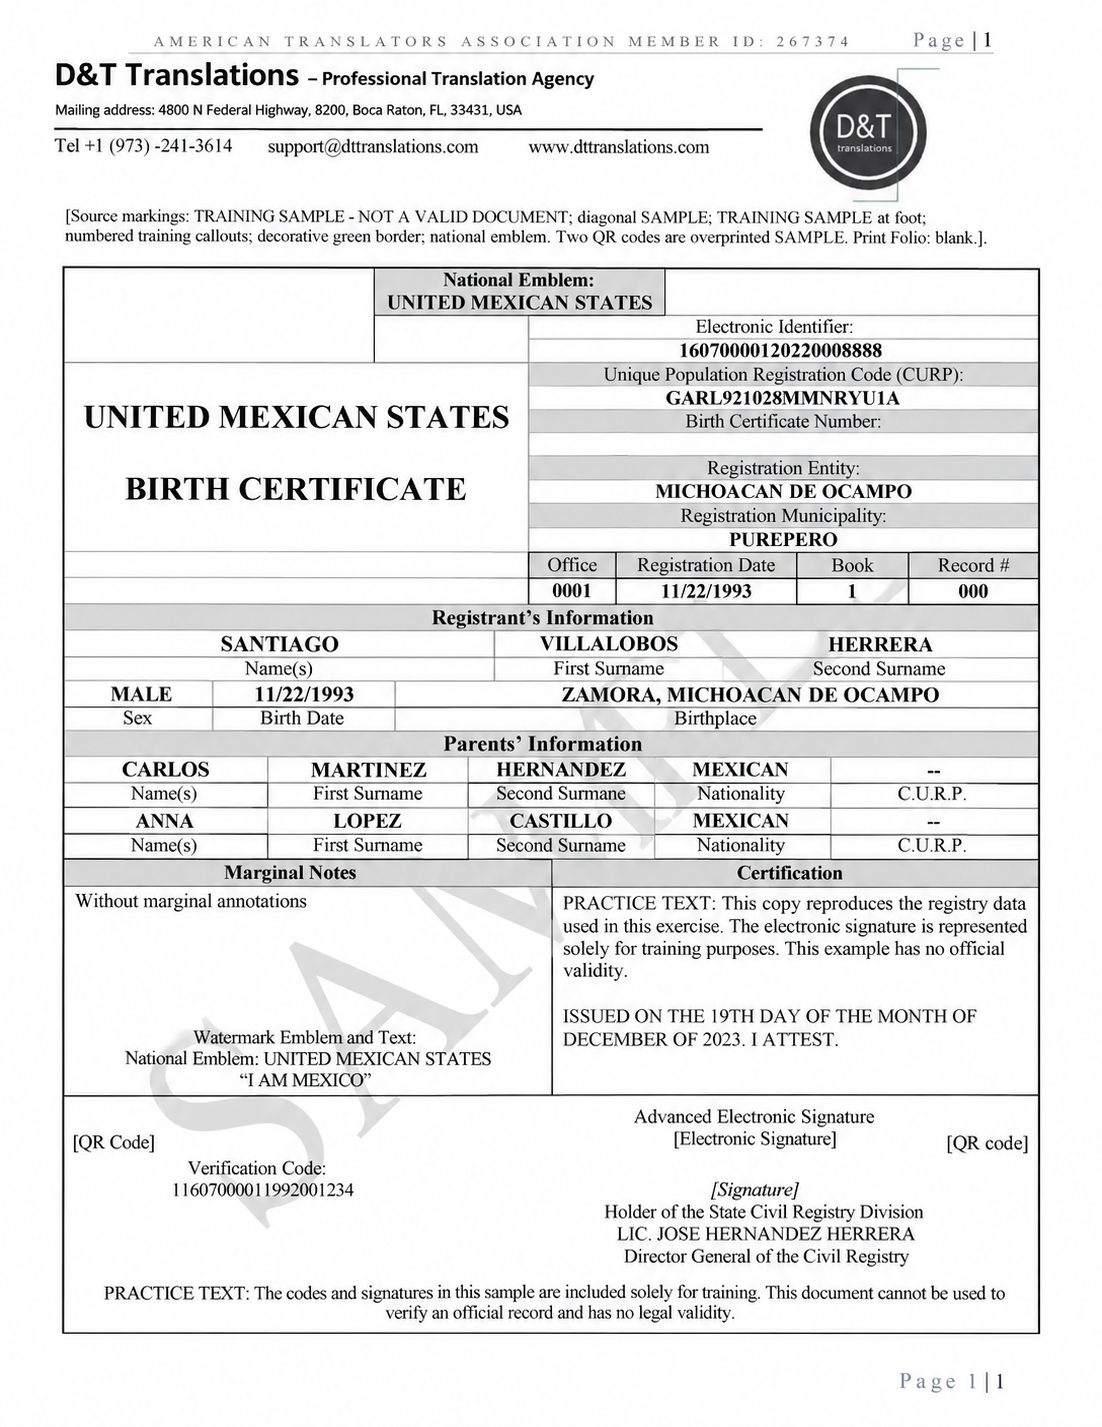
Click either image to open a larger version. These corrected training copies keep the supplied samples’ original designs. Names, dates, and identifiers are retained. Mixed-language labels and garbled passages have been corrected for the exercise.
Using this lesson for other languages → English
Our example is Spanish → English. You can follow the same steps for French → English, Portuguese → English, German → English, Arabic → English, Chinese → English, and other language pairs.
Translate directly from the original document into English. The table below gives useful Spanish–English examples, but another country’s certificate may use different fields and terms.
- Make a small word list. For a French certificate, write down the French label, what it means, and the English term you plan to use. Check the meaning in a reliable source. A local registry office is not automatically the same as a U.S. county clerk’s office.
- Follow the fields on that document. This Mexican example has two surname fields. Another certificate may have one. Keep each name with the right label instead of forcing it into the Mexican layout.
- Keep official codes as they are. CURP is a Mexican registration code. Keep the letters CURP and copy the code exactly. For another country, find out what its code means. Do not rename it “Social Security number.”
- Use the right method for names. Keep spelling and accents, such as José or François. For names written in another script, follow the receiving office’s required way of writing them in Latin letters. This is called transliteration. Check any passport provided and flag spelling differences rather than changing the record yourself.
- Keep the legal meaning. The words “Doy fe” in this example are spoken by the registry official. An English choice is “I attest.” Make sure the English still refers to that official, not to you.
If you cannot confidently read the original language, ask a qualified translator for that language pair to help. The final reviewer should understand both the source language and English.
1. Check what the client needs
Before you start, find out where the translation will be submitted. The receiving office means the university, court, government office, or other organization that will use it.
Ask which English variety and date format to use, whether a template is required, and whether the client needs Word, PDF, or both. Also check whether they need a translator’s certification or notarization. A well-written translation still has to meet that office’s instructions.
For an agency job, use the supplied Agency Word Template or Company Letterhead File. Letterhead is the company name, logo, and contact information already placed at the top or bottom of the page. Keep those parts intact and save a new working copy.
If you work independently, use your own professional template that meets the receiving office’s requirements. If an agency has asked you to use its template but has not sent it, request the file. Do not copy another company’s letterhead from a sample image.
Check that you have every page, the back of the document if it contains information, and any attached notes. Ask for a clearer scan if an edge is cut off or a number is blurry. For example: “Could you send a clearer image of the bottom-right corner? I cannot read the last two digits.”
Keep client documents in approved storage. Use only tools allowed for the job; a birth certificate contains private information, so do not upload it to an unapproved public OCR or AI service. OCR is software that reads text from an image.
2. Make a list of everything on the original
Before translating, look over the whole page and make a checklist. This helps you avoid missing a small stamp, a note at the bottom, or a number near the edge.
For a full translation, account for every item. Translate readable wording, copy names and codes accurately, and describe graphics when needed. You can show a signature with “[signature]” rather than drawing it. A simple border and a note may be enough for decorative features; follow the job instructions.
- Top of the page: the print-folio label, national emblem, country name, document title, electronic identifier, CURP, birth-certificate-number field, and registration locations. A folio is a document reference number.
- Registration details: office number, registration date, book, and record number. Check them separately.
- The person’s details: given names, both surnames, sex, date of birth, and birthplace. The form may call this person the registrant.
- Parents’ details: both rows of names, surnames, nationality, and CURP entries or dashes.
- Notes and official wording: marginal notes, the registry’s certification paragraph, law titles, article numbers, issue date, and the official’s statement.
- Bottom and background: signatures, printed electronic-signature data, the officer’s name and title, verification codes, QR codes, barcodes, web addresses, instructions, watermarks, and slogans.
The training banner, numbered callouts, and SAMPLE overlays are part of this exercise. Account for them in a note; do not copy them onto a real translation unless they are present on its source.
3. Translate the labels and check the details
A field is one labeled item on the form, such as “Birth Date.” First pair each label with its value. Then translate the labels and check the information beside them. Use the same English term each time it appears.
The table gives suggested wording for this example and related birth certificates. Check the context and the receiving office’s instructions before choosing a term.
| Source field or phrase | Suggested English | How to decide |
|---|---|---|
| Estados Unidos Mexicanos | United Mexican States | Translate this country heading. Keep it separate from the translation company’s letterhead. |
| Acta de Nacimiento | Birth Certificate | This is the title of the document: a birth certificate. |
| Folio de Impresión | Print Folio / Printing Folio | Translate the label and copy any readable number beside it. It is not the same as the electronic identifier. |
| Identificador Electrónico | Electronic Identifier | Copy every character, including zeros at the beginning. |
| Clave Única de Registro de Población (CURP) | Unique Population Registration Code (CURP) | Keep CURP and its code. You can explain the name in English, but do not call it a Social Security number. |
| Número de Certificado de Nacimiento | Birth Certificate Number | Keep this field separate. If it is empty, do not fill it with a number from another field. |
| Entidad de Registro / Municipio de Registro | State of Registration / Municipality of Registration | Check the label and location carefully. Translate the actual label shown; real documents may use different administrative terms. |
| Oficialía / Fecha de Registro | Civil Registry Office / Registration Date | Oficialía means the registry office, not the person working there. The registration date may differ from the birth date. |
| Libro / Número de Acta | Book / Record Number | Copy each number into its own field. For example, record number 000 must stay 000. |
| Datos de la Persona Registrada | Registrant’s Information | This heading introduces the details of the person whose birth was registered. |
| Nombre(s) / Primer Apellido / Segundo Apellido | Given Name(s) / First Surname / Second Surname | Keep both surnames in their original order. The second surname is not a middle name. |
| Sexo / Fecha de Nacimiento / Lugar de Nacimiento | Sex / Date of Birth / Place of Birth | Translate the labels and the values shown. Ask about an abbreviation if its meaning is unclear. |
| Datos de Filiación de la Persona Registrada | Registrant’s Parentage Information | Keep each parent’s details in the right row. Do not guess their role from a name or row position. |
| Nacionalidad | Nationality | Translate the nationality, such as “Mexican.” Keep personal names and official place names accurate. |
| Anotaciones Marginales / Sin anotaciones marginales | Marginal Annotations / No marginal annotations | Translate this statement even when it says there are no marginal notes. It does not mean there are no other marks on the page. |
| Certificación | Certification | This is the registry’s statement about its document. It is separate from your statement about the translation. |
| Expedido el día 19 de diciembre de 2023 | Issued on December 19, 2023 | This is the issue date. Do not confuse it with the birth date or registration date. |
| Doy fe | I attest / I hereby attest | Choose formal English that keeps the registry official as the speaker. |
| Firma Electrónica Avanzada / Código de Verificación | Advanced Electronic Signature / Verification Code | Copy any readable printed signature string or verification code. Describe a graphic with a note when needed. |
| Lic. / Director General de Registro Civil | Lic. [academic/professional title] / Director General of the Civil Registry | Lic. is a title. Keep it with an explanation if needed; do not guess a U.S. degree or say the person is an attorney. Translate the job title actually shown. |
Names and places
Keep names complete and in the same order. Do not change SANTIAGO to James or shorten a surname to make it fit. Keep accents that appear in the original. If a name needs transliteration, follow the agreed system and note any important difference from the passport supplied.
Keep place names accurate. For example, ZAMORA, MICHOACÁN DE OCAMPO is a place of birth. Do not turn it into the name of a hospital or registry office.
Dates
Check the birth date, registration date, and issue date separately. They describe different events and may be different dates.
In this edited training sample, both the birth date and registration date read 11/22/1993. This can be written as “November 22, 1993”: 22 cannot be a month. On other records, the dates may differ. A date such as 03/04/1993 can mean March 4 or April 3, so check the source’s date convention before choosing.
Use the English date format requested for the job. If a date uses another calendar, keep the recorded date and show any agreed conversion separately. Do not silently replace it.
Codes and numbers
Copy codes exactly. Office number 0001 must not become 1, and record number 000 must not become 0. Do not add spaces or hyphens to a CURP.
Check long codes in small groups of characters, then check them again from the end to the beginning. Watch for look-alike characters such as O and 0, or I and 1. If you cannot tell which character is shown, request a clearer image.
If a code seems inconsistent with a name or date, flag it. Do not “fix” the original record yourself.
Empty, unreadable, or conflicting information
A blank field is different from an unreadable field. Keep a printed dash as a dash. Where a note is needed, you can use:
- [blank in source] — there is no entry.
- [illegible] — text is present, but you cannot read it.
- [partially obscured] — something covers part of the entry.
Keep any part you can read. Do not turn an empty field into “not applicable” unless that is what the original says.
A translator’s note is a short explanation that you add, clearly marked as your own. For example: “[Translator’s note: The date is partly covered by a stamp.]” Put the note beside the affected item, or make it clear which item it refers to. Keep spelling errors or conflicting details in the original visible; ask for clarification rather than silently correcting them.
4. Describe stamps, signatures, and codes
Use short notes in square brackets to describe things that are not ordinary text. For example:
- [signature] shows where a signature appears.
- [QR code] or [barcode] shows that a code graphic is present.
- [National emblem bearing the words: UNITED MEXICAN STATES] describes the emblem and translates its readable words.
Keep descriptions factual. A seal’s appearance does not prove that the document is authentic. Do not trace a signature, redraw an official seal, or make a replacement QR code.
A printed electronic-signature string is different from a QR-code graphic. If the original shows a readable string of letters and numbers, copy it. If you can see only a graphic, describe the graphic. Do not add “[Electronic Signature Chain]” just because another sample uses that wording.
Also check background text and slogans. A watermark is faint text or an image behind the main text. Here, “Soy México” can be translated as “I am Mexico” inside a watermark description. “MUESTRA DE ENTRENAMIENTO” means “TRAINING SAMPLE.”
Keep the training banner and watermark visible in this exercise. Describe emblems and codes in brackets when appropriate. You can describe the ornamental border with “[decorative border]”; translate any meaningful words inside it.
5. Check the corrected training samples
The designs are preserved, with targeted text corrections. Check the details below as you work.
- Names: Keep SANTIAGO VILLALOBOS HERRERA, CARLOS MARTINEZ HERNANDEZ, and ANNA LOPEZ CASTILLO exactly as shown. ANNA has two Ns. Do not add accents that are absent from a printed personal name.
- Dates and numbers: Both birth and registration dates read 11/22/1993. Keep office 0001, book 1, and record 000, including every zero. Compare identifiers character by character.
- Spanish labels: HOMBRE translates as MALE; MEXICANA translates as MEXICAN. The corrected parent labels are Spanish, and “Código QR” replaces the typo “Código OR.”
- Certification and footer: The garbled passages were replaced with matching, explicitly labeled practice text. Do not use those passages as official legal wording. On a real job, request a clearer original instead of repairing its wording yourself.
- Signature and title: Account for the signature placeholders and both job titles. Preserve LIC. JOSE HERNANDEZ HERRERA as a name with a title, without guessing a U.S. degree.
- Remaining training marks: The source’s callouts and overlays are exercise additions. Describe them separately. The English sample includes a source-description note for these additions; it is not a signed certified translation.
- Page count: The corrected English sample is one page and shows “Page 1 | 1.” Your own Word file must display its actual page count.
6. Keep the two kinds of certification separate
The box headed “Certificación” is the civil registry’s statement about the birth record. Translate it as part of the original document.
Your translator’s certification is a separate statement about your translation. It usually goes in the agreed template section or on another page. The English sample is a teaching example and does not include a signed translator’s certification.
For example, the registry’s statement may explain when its copy was issued. Your statement explains that your translation is complete and accurate. One does not replace the other.
ATA’s U.S.-focused guidance lists these basic items for a translator’s certification:
- The signer’s translation qualifications.
- A statement that the translation is complete and accurate.
- The document and languages being certified.
- The signer’s name, signature, and date.
Use the wording required for the assignment. An agency’s ATA membership does not make every translator ATA-certified. Notarization is also different: it concerns the signer’s identity or signature, not the accuracy of the translation. See ATA’s explanation of certified translations.
7. Check your work before sending it
- Have you checked all pages, edges, notes, and background wording?
- Have you translated or described every item on your checklist?
- Are the names complete, in the right order, and spelled as shown?
- Have you checked every date and code, including zeros at the beginning?
- Do the law references, official titles, and words such as “no” or “without” match the original?
- Have you flagged unclear text instead of borrowing wording from the English sample?
- Are your translator’s notes clearly marked?
- Is the registry’s certification separate from the translator’s certification?
- Has a reviewer who knows both languages checked the translation where required?
- Have you raised any unanswered questions before certifying the translation?
Try it yourself
Cover the English sample and translate the Spanish practice form. Then compare the two versions using the checklist above. Check the birth and registration fields separately, even when they show the same date, and compare every code and zero.
For a separate error-spotting exercise, make a disposable copy of your own practice translation and deliberately change ANNA to ANA or office 0001 to 1. Ask a colleague to find those changes. Keep the main sample pair unchanged.
Next, use Lesson 2 to format your translation in Word. For real assignments, always ask about unreadable or missing text rather than guessing; this clean practice pair is not a reason to ignore a problem in another document.
Further reading and scope
These lessons are for agencies and independent translators. The images are corrected practice samples, not official documents or signed certified translations. Use the examples to learn the method, then follow the instructions for your own job and the office receiving it.
- ATA: What Is a Certified Translation? — U.S. certification context.
- AUSIT: Official and Legal Document Best Practices — supplementary professional guidance; Australian conventions may differ.